meta

Picture Hanging Tips for Small Spaces and Apartments

Picture Hanging Tips for Small Spaces and Apartments - Feature Image

Hanging pictures and artwork in small spaces and apartments presents a unique set of challenges. From curating the best possible layout, to showcasing key pieces, to utilising the space to ensure your artwork and pictures don’t encroach on the space and make things feel smaller than they are. 

In small spaces, a considered approach to picture placement and art hanging can dramatically improve the aesthetic of compact living or working areas. It goes beyond finding the right spot on the wall to hang, and extends to curating an ambience that extends the visual space and infuses the unique personality of your pictures and art into your space.

To better understand this fine balancing act, this article is tailored for those grasping with special constraints. In this article, we’ll explore the hanging techniques that can be used to make the most of small spaces, make a bold statement, and leverage your art and pictures for maximum impact. 

Table of Contents

  • Picture Hanging Tips for Small Spaces and Apartments
    – Maximising your space
    – Make a statement in small spaces
    – Leveraging narrow spaces
    – Large art & small spaces

Picture Hanging Tips for Small Spaces and Apartments

Infographic 1

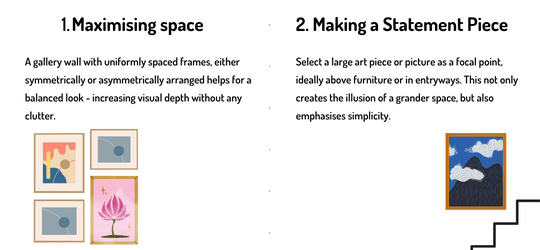
1. Maximising Your Space

Limited space doesn’t have to mean limited impact, instead, it comes down to maximising your space to ensure your art becomes a feature, not an encumbrance.  

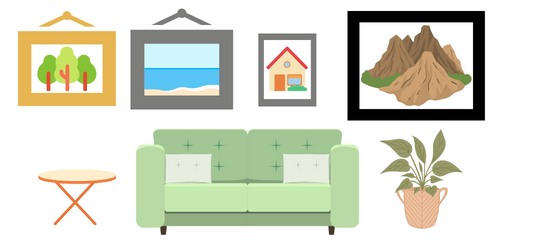
Creating a gallery wall with uniform spacing between frames is a simple way to increase visual depth, without adding clutter. A symmetrical or asymmetrical display can create a balanced and dynamic atmosphere by paying special attention to the arrangement and spacing of frames. 

In addition to the size and spacing of your art, the colour scheme and colour blocking of your arrangement can have a significant impact on the overall appearance of the art or pictures. In general, lighter colours tend to create a feeling of openness, while darker colours can be used to add depth and create a feeling of cosiness. 

2. Making a Statement in Small Spaces

Making a statement in small spaces can be as simple as choosing a large piece of art or a large picture to serve as a dramatic focal point. This approach to creating a ‘feature’ piece is especially effective when placed above furniture, entryways, or stairways to transform these spaces into captivating focal points – irrespective of how small the space is.

By drawing focus toward a single point, the illusion of a grander space is created. This effect can be enhanced by reducing the amount of visual clutter in the area around the focal point — much like how artwork is framed with matte borders to accentuate its visuals. For that reason, this method is also ideal for those who value simplicity in their space as only a few well-placed art or pictures are needed to achieve a significant effect.

Infographic 2

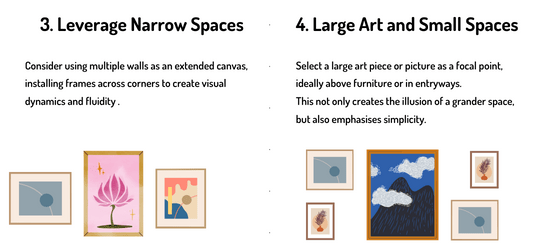
3. Leveraging Narrow Spaces

Narrow spaces are neglected most of the time for two main reasons: one, space limitations, and two, they don’t get much exposure anyway. While both of these reasons are perfectly valid, there are ways to leverage your narrow spaces for picture hanging. 

The first way is to go across walls. Instead of viewing narrow spaces as isolated areas, you can combine multiple walls with these spaces into one extended canvas for picture hanging. For example, installing a sprawling series of frames across the corner of two walls can create a sense of fluidity between them and make your space feel more dynamic.

Another solution for making the most of narrow spaces is to think vertically. Using the full height of the wall helps to create an illusion of space, making the decorated area seem bigger than it really is, and is also a good alternative when there aren’t long continuous walls in the space. 

4. Large Art & Small Spaces

Got a large art piece that you’d like to hang in a small space? Space constraints are the biggest restriction for large art, so the key to hanging them lies in the arrangement of surrounding objects such as furniture, shelves, or even other picture frames. 

When fitting large artwork in small spaces, don’t be afraid to rearrange your space. Start by finding an area on the wall that can comfortably house the artwork, taking into account the space that will be occupied by framing and borders. Placement for the biggest artwork should always come first, as smaller elements can always be easily repositioned. 

Speaking of smaller elements, be sure not to overlap or overcrowd the area around the large artwork. Give it sufficient space to ‘breathe’ by making use of negative space. 

Final Thoughts

Getting the best outcome when hanging art in small spaces is all about finding the right balance between colour and arrangement. A professional picture-hanging service will be able to achieve this balance using their expertise and the right tools for the job. 

Professional Picture Hanging is the leading picture and artwork service in Australia. Whether it’s a vintage painting or a charming family portrait, we’ll work with you to find the perfect framing and picture hanging placement in your home. If you are looking for a reliable way to hang your new piece of artwork, just give us a call, and we’ll get it done for you on the same day. As well as picture rail systems,  we have art installers across Sydney, Melbourne and Brisbane – we’ve also now got picture hangers on the Gold Coast, Newcastle, and Byron Bay!

How to Display Certificates on a Wall

how to display certificates on a wall

Your certificates aren’t just pieces of paper — they’re enduring testaments to your achievements and milestones. Display your certificates on a wall as a reminder of your accomplishments, adding personality and professionalism to your wall space.

This guide will discuss how to display certificates on a wall. Follow us as we discuss preparation, layout, out-of-the-box ideas, cleaning, and maintenance. Whether you’re hanging a university certificate, diploma, or sports accomplishment, it’s important to hang and display certificates safely to ensure that both the property and the certificate itself are protected.

Preparing Your Certificates for Display

To ensure your certificates look great on your wall, prepare them properly. Certificate preparation includes the following considerations:

Proper cleaning

Set your certificates down on a dry, flat surface and wipe them on both sides with a dry, soft cloth to remove dust and dirt. Depending on how thick your certificate is, water and cleaning solutions can damage the paper — you won’t want to hang your certificate on your wall if it’s smudged, so take care when cleaning!

Choosing the frame

Your certificate’s frame should complement your room, the wall, and the certificate itself. Your choice of frame will depend on the following factors:

  • Material: Solid wood frames provide a classic and durable design for your certificate. Aluminium and other metal frames give your certificate a sleek, modern look. Polystyrene is another affordable and lightweight frame option.
  • Colour: Your frame’s colour should match or contrast the colours in your room and the colour of the certificate. Make sure the certificate is what catches the eye, not the frame.
  • Size: Ensure your certificate fits in the frame with just a little extra room.

Protective Measures

Consider protective measures like UV-resistant glass and acid-free-matting to ensure your certificate stays in good condition. With UV-resistant glass, your certificate will be protected from fading from sunlight exposure, and acid-free matting will stop your certificate from yellowing.

Preparing your certificates for display ensures that they can be hung safely and stay up on your wall for years to come. Your future self will thank you for taking the necessary precautions.

how to choose the right frame for your certificate

How to Display Certificates on Wall: Layout and Arrangement

Before you start displaying your certificates, plan the layout and arrangement. This includes the following steps:

Determine the wall space

Measure the wall space you’ve chosen and each certificate. Decide how many you want to display and which ones are most important. You don’t want too many to be hung as this can overcrowd the space and make it feel cramped.

Decide on the layout

Choose your layout. It can help to draw a diagram on some scrap paper to visualise how it will look or use paper templates that match the size of your framed certificates. Adjust them until you’re satisfied — you can use blue tack or tape to stick them in place on the wall and view them from afar. Try the following arrangements:

  • Grid: Arrange the certificates in even rows and columns for a clean, symmetrical look.
  • Staggered: Create an alternating or irregular pattern for visual interest.
  • Vertical: If you have limited horizontal space, display your certificates vertically.
  • Horizontal: Arranging certificates horizontally creates a sense of continuity and allows you to display them in chronological order.

Take note of which certificate will be at eye level — this is pride of place, so choose the best one!

Techniques for Displaying Certificates

Use safe and appropriate materials and techniques for displaying certificates. Choose the proper equipment for the job.

Mounting hardware

Depending on the size, weight, and material of your certificate frame, you may use any of the following mounting hardware:

  • Picture hooks
  • Adhesive strips
  • Picture hanging wire
  • Wall anchors

Level and spacing

When hanging your certificates, try the following techniques:

  • Use a level to ensure your certificates are straight. Place the level on top of the frame when you hang it to check that it’s straight.
  • Measure the distance between each certificate to ensure they’re spaced consistently.
  • Mark the wall lightly with a pencil and ruler where you want the mounting hardware to go to ensure accurate placement.

Your certificates are invaluable records of your achievements, so it’s vital to ensure their safety. For the best and safest results, consult professional picture hanging services.

how to maintain your certificate display

Creative Ideas for Displaying Certificates on a Wall

If you’d like a unique and creative display for your favourite certificates, consider creating custom frames by painting them in your chosen colours or adding embellishments. You can also combine your certificates with other pieces of art or memorabilia — creating a gallery wall can add visual interest to your room and showcase your achievements alongside some of your favourite visuals.

Maintaining Your Display

After displaying your certificates, don’t just forget about them — to keep your display looking its best and ensure your hard work pays off, maintain the display by following these three tips:

  1. Dust and clean your frames regularly. Use a soft, dry cloth to wipe down the frame and glass. Avoid using damp materials or cleaning solutions, as they can seep into the frame and damage your certificate.
  2. Check your certificates for damage. If you notice fading, yellowing, or warping, you may need to replace the frame or glass to protect the certificate better.
  3. Update the display to refresh the space and stay up to date with your current achievements. We’re sure you’re a high achiever, so display the most recent certificates or those you’re most proud of. You can also rearrange the certificates so you don’t get bored of them.

Let Professional Picture Hanging Help You Display Your Certificates

By following the simple steps in this guide, you’ll enjoy a professional and visually appealing display of all your most important certificates. If you need help hanging your certificates, consult the experienced team at Professional Picture Hanging for hanging solutions and system installation. We provide expert certificate framing and hanging services across Australia, so get in touch today to display your favourite certificates and show off your accomplishments on your walls.

Hanging Pictures on Plasterboard Walls: Is It Possible?

what is plasterboard?

If you’ve got a framed picture, artwork, or prized document you want to show off, the best way to display it is to hang it on the wall. But before you start hammering away, check what your wall is made of. If it’s plasterboard or drywall, consider the age-old debate: “Can you hang pictures on plasterboard walls without turning your wall into something resembling Swiss cheese?”

Let’s dive right into this burning question and take a look at how you can best hang pictures on your plasterboard walls.

What are plasterboard walls?

Plasterboard, also known as drywall, is a building material known for its affordability, versatility, and ease of installation. Plasterboard is commonly used for interior walls and ceilings in residential and commercial buildings. It is made of gypsum plaster, which is sandwiched between two layers of paper. While it has many advantages, plasterboard is unfortunately not as sturdy as brick or wood walls. This makes picture hanging a more challenging endeavour, as the standard method of hammering a nail into the wall quickly becomes rather messy and ugly when dealing with plaster. But not to worry; picture hanging on plasterboard walls is undoubtedly possible.

define plasterboard

Can you hang pictures on plasterboard? Yes – here’s how:

Get the right tools for the job

While using nails to hang pictures works well for brick and wood walls, it will only end in tears (and crumbling holes) for your plasterboard walls. Instead of nails, consider suitable alternatives, such as:

  • Brass hooks
  • Click rail cable hanging kits
  • Wall studs
  • Threaded plasterboard anchors
  • Toggle hooks
  • Plastic wall plugs

When choosing the proper hardware, consider the weight and dimensions of your artwork, the recommended maximum weight for your hanging tool, and whether your wall has sturdy wall studs. For best results, get your tools from reliable hardware stores. If you plan to hang multiple pictures, ensure you get enough hardware for all of them – or invest directly in a sturdy picture hanging system made specifically for hanging and installing artwork.

A guide to hanging pictures on plasterboard walls

Once you’ve got all your tools and hardware, it’s time to get to work. If you’re not sure how to hang your picture on a plaster wall, it’s important that you do it properly to ensure safety, longevity, and efficiency.

  1. Gather your tools — a pencil, measuring tape, hammer, level, and whatever hardware you’ve chosen for your picture.
  2. Locate any wall studs (beams that support the frame of your home, made of sturdy wood) — if you can find them, you can secure your picture to them. If not, no worries — you’ll probably have to use a plasterboard anchor.
  3. Measure and mark where you want to hang your picture. If you have a friend, get them to hold the picture in place while you take a step back — it’s all about perspective!
  4. Install your hardware, whether it’s a brass hook, hanging rail, plasterboard anchor, or toggle hook. Follow the manufacturer’s instructions carefully.
  5. Hang your picture once you’re sure the hardware is firmly in place. Use a level to ensure that it’s perfectly straight (or don’t — sometimes crooked pictures provide a little bit of charm!)
  6. Admire your picture! Step back, have a drink, and reward yourself for your hard work.
tools used to hand pictures on plasterboard walls

Avoid these common mistakes

Your walls make up your home, so it’s essential to treat them well and avoid causing damage through incorrect hanging methods. Common mistakes when hanging pictures on plasterboard walls include:

  • Overloading the wall with heavy pictures.
  • Not taking the artwork’s weight and dimensions into account. 
  • Using improper hardware and techniques.

Hanging heavy pictures on plasterboard walls is a risky endeavour, but you can minimise damage to your walls and pictures by using the proper hardware and techniques suitable to your picture’s weight and dimensions. To avoid making costly mistakes, carefully follow the manufacturer’s instructions for any hardware you use. Take note of maximum weight thresholds for hooks and consider the picture’s size. Using wall studs to support your hardware is recommended, especially for heavier pictures.

Consult professional picture hanging services

If you prefer a hands-off approach or are concerned about damaging your walls and pictures, the best solution is to hire professional experts to assist you with your picture installation. Professional Picture Hanging offers reliable and fast picture hanging services across Australia. We offer an array of picture hanging services across Sydney, Melbourne, Brisbane, and Newcastle, from simple picture hanging to large-scale art installations. Contact us if you need picture hanging systems or picture hanging or framing services and solutions, and we’ll help you make the most of your plasterboard walls and display your favourite photos and artworks.

Conclusion

So, is it possible to hang pictures on plasterboard walls? Yes — absolutely! While plasterboard walls aren’t as sturdy as brick and wood walls, you can reap the same benefits by taking advantage of wall studs, brass hooks, plasterboard hooks, claws, toggle hooks, and other hardware specifically suited to hanging pictures on plaster walls. With the appropriate hardware, techniques, and patience, you can transform your plasterboard walls into a gallery-worthy display. 

When in doubt, get help. If you’ve got a friend or family member around, ask them to help you. But it’s always best to consult professional services if you’re unsure how to hang pictures on your plasterboard wall. Additionally, if you have other walls made of different materials, check out our guide to hanging pictures on different wall materials. There’s a solution for every wall, and we can help you with it.

Do You Have to Hang Pictures on a Stud?

Do You Have to Hang Pictures on a Stud? Cover Image

Do You Have to Hang Pictures on a Stud? Cover Image

Decorating your walls with your favourite framed picture adds a touch of personality and classiness to your home. When hanging a heavy piece of art on the wall, you’re probably wondering “do you have to hang pictures on a stud?” – we’ve all been there. While this question might seem like a simple yes or no question, there are more thing to consider:

What Are the Most Popular Options for Hanging Art or Photos?

When it comes to hanging artwork in your home, apartment, or business – there are a few things and options that you can consider.

Your wall material and the placement that you are looking to achieve will (obviously) be two important factors to consider, but beyond that, there are a few options that you will have for hanging artwork or photos.

Some of the most popular options for hanging art or photos include:

  • Studs – which we will go into in some detail below
  • Picture rails – these can be a great option, albeit pricey
  • Small nails or screws with a hook – popular but can cause some superficial damage walls which an cause headaches for if you live in a rental property.
  • Adhesive strips or Velcro – these are generally restricted to very light frames

As you can see, there are no shortage of options when it comes to hanging pictures. In this article, we’re going to double down on hanging pictures with studs to provide you with a balanced view on the pros, cons, and what you need to consider before charging your drill.

The Benefits of Using a Stud for Your Pictures

Using a stud for hanging up your favourite pictures and art installations comes with a lot of benefits, that help you to make it the highlight of the room. Here are just a few benefits of studs for picture hanging:

Studs Add to Structural Stability:

Studs significantly increase the safety and stability of your pictures on the wall. They securely fasten the picture to the wall and prevent damage to your walls, such as draught or the own weight of your framed pictures.

Studs Improve the Aesthetics:

Hanging your pictures on a stud is beneficial for the visual aesthetics of your favourite art pieces. If used correctly, you won’t stand back after hanging a picture and realise its crooked. Instead, studs create a level and organised display of your pictures.

Studs Give You Decorative Flexibility

Well placed studs can change your walls into your own little art gallery. If you don’t enjoy a certain picture anymore or want to change your decoration for the holiday season, you can easily move them around and rearrange your decoration by using the same studs for other pictures.

Studs Save Time and Money

In comparison to other picture hanging methods, hanging pictures on your studs are easy to install and don’t require a lot of hardware to put in the wall safely. As they require minimal effort to install, the art installation will be done in no time. Additionally, using studs makes art installation more cost efficient than other methods.

Do You Have to Hang Pictures on a Stud? Four Benefits of Studs Infographic 1

Do Picture Hooks Need a Stud?

The short answer is – it depends.

Picture hooks do not necessarily require a stud in order to be functional and useful. The best rule of thumb to apply is that heavy items (think: mirror, heavy frame etc.) will require a hook that is anchored to a stud.

On the other hand, if you’re looking to hang something like a lightweight picture frame or small mirror, you can get away with using a simple adhesive hook and won’t require a stud as an anchor point.

In short, if you can hold the frame comfortably with a single finger, then you may not need a stud. If your finger begins to buckle, then it’s probably a good idea to use a stud to make sure that there are no issues or unwanted crashes in the middle of the night.

Do You Have to Hang Pictures on a Stud? Do Picture Hooks Need a Stud? Infographic 2

Tips for Finding the Right Place to Mount Studs

First and foremost, unless you have experience or room for error, then it’s always best to call in professional picture hangers to help with mounting art, mirrors, or frames in your home or office. If you’re hellbent on DIY and fancy yourself as a contender on the next series of The Block, then here are some tips that you need to follow:

Measure thrice, mark twice, drill once – like anything, take your time to make sure that you are measuring and marking before making any irreversible changes to your walls.

Carefully consider height – more info about hanging pictures at the right height can be found in our comprehensive guide.

Use multiple studs where required – some images will require more than one anchor point – make sure that you use multiple studs where required.

Wrapping up

So, there you have it. While it is entirely possible to hang pictures on a stud, it may be better to call in the experts to make sure that you’re not woken in the night with the dreaded sound of your priceless family artefacts crashing to the ground.

Leaving it to the pros means that you can be sure that your art work is going to look great and is secure and safe. Whether you’re looking for picture hangers in Melbourne, Sydney, or Brisbane – we’ve got you covered.